
In 1969, Ford decided to try gluing windows to their brackets rather than using bolts. In my research, I have yet to come across what I consider to be a rational reason why they would have done this, but nevertheless this experiment lasted through the 1969 Mustang and Cougar model year and into the first few months of 1970 before being scrapped.
Way back in March, I discovered that the glass from both the driver door and driver-side quarter window had separated from their respective brackets and needed to be re-glued:

I’m about as much of a glue guy as I am a paint guy, so you can imagine that this job hasn’t been at the top of my TODO list. Inevitability being what it is though, this week’s activities finally saw me taking on the challenge of trying not to glue myself to my workbench.
The process for repairing Mustang and Cougar glue-in glass is beautifully detailed in the following video from West Coast Classic Cougar:
For the most part, I followed the instructions in the video to the letter.
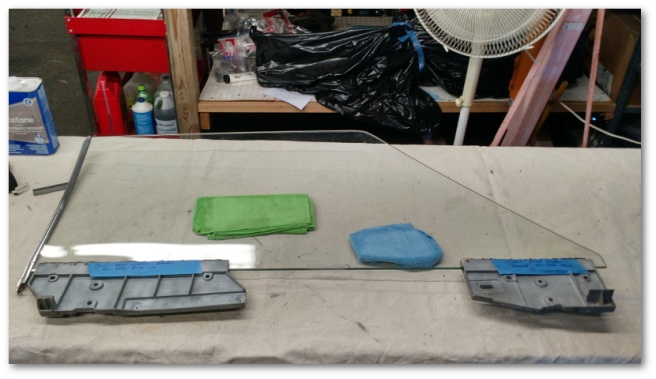
I started by cleaning off all of the old glue that still remained on the window:

Once I had a clean spot, it became painfully obvious how dirty all of the other windows were:

Yuck! I then proceeded to spend upwards of an hour cleaning all four windows until I was satisfied they were clean enough to touch without hand protection:

Along the way, I sadly discovered that my driver’s side quarter glass is badly scratched – probably from rubbing up against the rock-hard weather stripping I took off:

Looking on the bright side, I get to learn how to polish glass this week…
Once the windows were clean, I dry-fit the brackets and outlined their location using a Sharpie:

I then proceeded to purposefully scratch that part of the glass with 100 grit sandpaper in an attempt to give the glue a better bonding surface:

Finally, it was time to glue. I used the recommended window bonding adhesive from the video with a hacked-up home made applicator:

In the end, I had enough adhesive to glue the quarter window bracket in place:

The two driver’s side door window brackets into place:
I even had enough left over to almost-but-not quite fully glue in the parts by Craigslist weather strip channel on the passenger side door window:

The only item I didn’t have enough glue for was the driver’s side center window bumper shield – a little piece of metal that sits on the window glass and makes contact with the bottom window stop. Rather than spend another 20+ dollars on the specialty glue for this one little piece, I decided that since it was not load-bearing, any decent epoxy would work. It was affixed with a generic automotive adhesive and I have little doubt it will stay put for as long as I care it to.
With the surprisingly drama-free gluing out of the way, I decided to start working on the rest of the window hardware.
To be honest, in the condition the hardware was in I’m surprised the windows worked at all:

That’s one of the rear quarter window guides. The crap inside the guide channels was sticky, gross and actually fairly hard to remove. My sand blaster helped, but still didn’t get everything. In the end, I had to use a very stiff wire brush, acetone and a lot of expletives.
Here’s a comparison shot between a clean and dirty window guide to give an example of how bad they really were:

With the window guides cleaned up, I turned my attention to the window runs. These poles are what the window brackets glide over as the window goes up and down. They were likewise covered in the remnants of whatever lubricating substance seemed like a good idea at the time back in the late 60’s:

In this case though, clean up was a breeze. With about five minutes each on the wire wheel, the runs came out shiny and clean:

And that’s where I had to call it a week. I’m still not done with “project window” – not by a long shot. I have a whole rolling cart top full of stuff that needs attention:

In particular, I know I have a bent connector on one of the window regulators that needs to be straightened. The regulators also need to be cleaned up and lubricated. The other random parts in the bags need to be gone through and cleaned up as necessary. Lastly, I have the window polishing kit showing up this week for me to attempt to de-scratchify my drivers quarter window.
In theory, what’s left should be a good week’s worth of work which would be remarkable considering I was expecting this project to take three to four weeks. I am actually at high risk of the unprecedented accomplishment of getting something done earlier than expected.

4 thoughts on “Window Dressing…”