
August has been a fairly slow month for work on the Mustang. Progress has been made, but it’s been slower than I would have liked. A significant contributing factor to the lack of productivity has been Mother Nature:

Those are just the temperatures outside. Inside my uninsulated, non-air conditioned shop have been even hotter.
Nevertheless, I was able to wrap up the restoration of the lower dash this weekend.
I started with the component parts of the heater control unit I took apart last week:

Each piece was looked at and individually restored as necessary.
The knobs and faceplate were replaced with new ones while the metal assembly was media blasted and painted. I also painted the plastic bezel the correct color black.
After the bezel was painted, I needed to restore the silver trim around the slider switch housings. You can see in the picture above that the original silver trim had faded away to almost nothing in some areas. With the original highlighting in such bad shape, I didn’t bother trying to keep it. Instead, I went to an arts and crafts store and purchased a couple of silver paint pens:

I used those to paint the trim area to match as closely as I could the original look. I’m actually fairly happy with how it turned out:

After it was all put back together, I was even happier:

The knobs are so shiny you can tell I was wearing a red shirt when I took the picture.
I then started on the assembly of the rest of the lower dash. First on the docket was the installation of the glove box door and componentry:

It took a while to get the door aligned properly with its latch and stop, but in the end when you press the button the door snaps open with a pop and doesn’t require any finger-prying to open like it did before.
After I was finished with the glove box door, I moved on to the ash try and lighter housing. I lubricated the ash try guides so it goes in and out smoothly. I also tightened up the lighter housing so it doesn’t rattle in its socket any more.
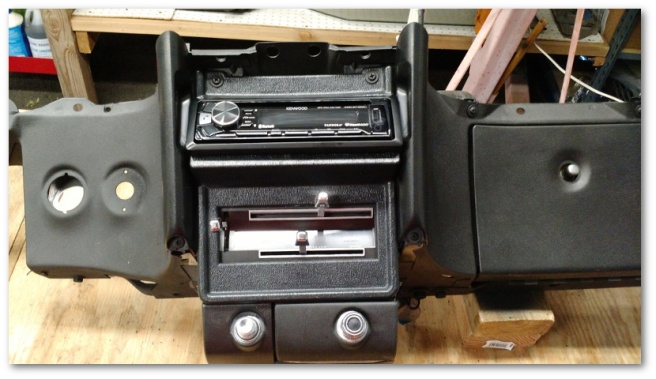
Moving up, I installed the heater switching unit, the radio/heater switch bezel, the radio and the side moldings. When finished, I finally had something that actually looked pretty good:
Aaaand then I took it all apart again because I forgot to do this:

The lower dash electrically grounds to the body through its fasteners to the interior dash mounting brackets. The light for the heater controls also grounds to the body – by way of the switch assembly and the central dash mounting brackets. The hazard, turn signal and choke relays all ground through their mounting points on the lower dash as well.
All of these pathways needed to be stripped of their paint to allow for a clean ground path and (hopefully) no electrical glitches in the future.
Since I was “thinking electrical” I decided to install the lower dash electrical connections while I was there. This involved trying to remember which relay went where, failing and doing some research on Google. It turns out that the hazard relay is on the driver’s side of the dash while the turn signal relay is on the passenger. I also installed my custom heater core relay:

And finally, I was done:
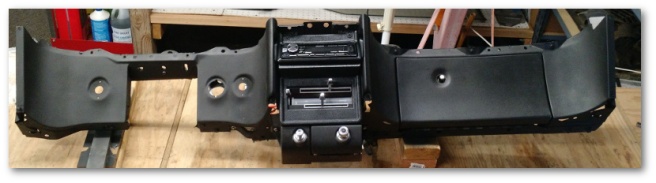
The lower dash is now wrapped in plastic trash bags awaiting installation sometime next year.
I’m thinking next on my list is going to be the window brackets. I’ve been procrastinating that messy glue job for long enough. Mother nature willing, I’ll get started on it later this week.

3 thoughts on “Lower Dash Restoration – Assembly…”