We Are Go For Paint…

I never did call the body shop back that said they’d “think about it and get back to me.” I figured if they wanted the job, they’d get back in touch with me and talk to me about it.

They never called. I guess they don’t want the job, and likely no amount of proposals on my part would change that. Que sera sera…

What I did do this week was visit one of the local automotive paint stores. I figured if anyone would know of a reputable body shop that would be willing to paint the Mustang, they would. Thankfully, I was right. They gave me the names of a couple of shops in town who they were fairly certain would be willing to take on my project.

One of the body shops they recommended was Dad’s Toy Shop in Grants Pass. I gave them a call and set up an appointment for the next morning to have them come out and take a look at the Mustang. They arrived right on time and I could immediately tell the difference in enthusiasm between these guys and the folks that visited last week.

We talked for a while and I showed them what they were up against. They told me that they give customers a fixed bid – and deliver to that bid exactly unless something goes spectacularly wrong. They then proceeded to give me a quote that was right at the max range of my budget.

Finally, someone willing to take on the paint and body work for the Mustang at a price I’m willing to pay! Woooo!!!

It gets even better, too. While talking to them the subject of what I do for a living came up. I told them I’m a software engineer who architects web sites. “Hey, we need a web site! Are you interested in some kind of barter arrangement?” You bet I am! We talked some more about what they’re looking for and it looks like I can knock about 10% off the price of my paint and body work by putting together a reasonably straightforward site for them with some marketing material and photo galleries of past projects. I think it’ll be a win-win!

The Mustang should head down to their shop tomorrow or Wednesday. It’ll be there for a while – they’re promising that it will be back by Christmas. That’s kinda a downer, but within reason for custom paint jobs as I understand it.

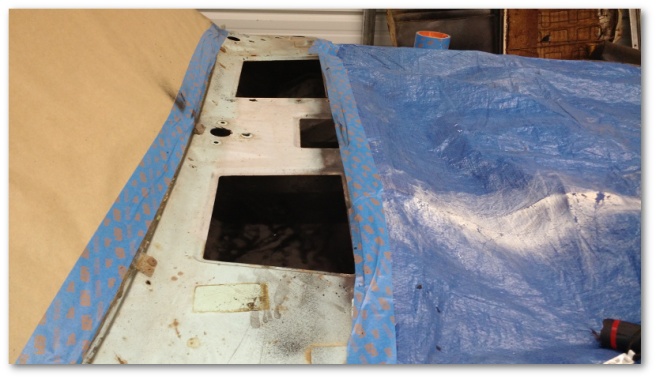
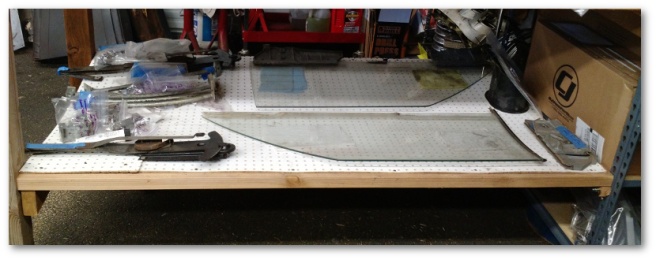
To get the Mustang ready for it’s journey, I took pretty much everything that was on the bottom stuff-to-be-painted shelf of my temporary shelving:

organized chaos with new temporary shelving

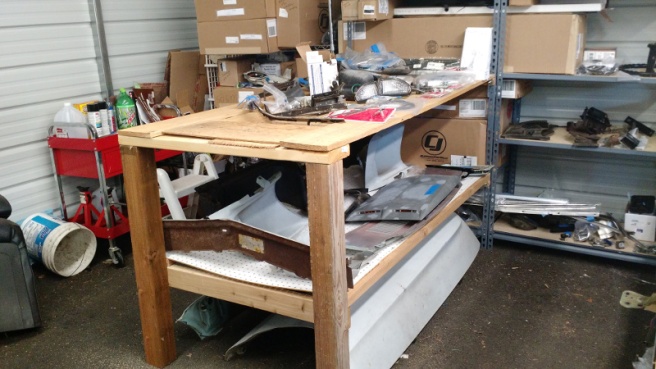
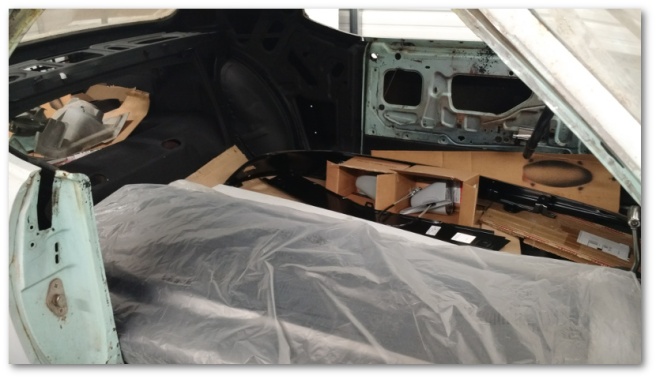
…and squeezed it into the car:

paint shelf contents in mustang

This left the stuff-to-be-painted shelf free of items, for all of 30 seconds.

Over the last couple of months, I’ve had my door glass and other items in a semi-precarious location on temporary shelving mounted on top of my utility trailer:

glass on utility trailer shelf

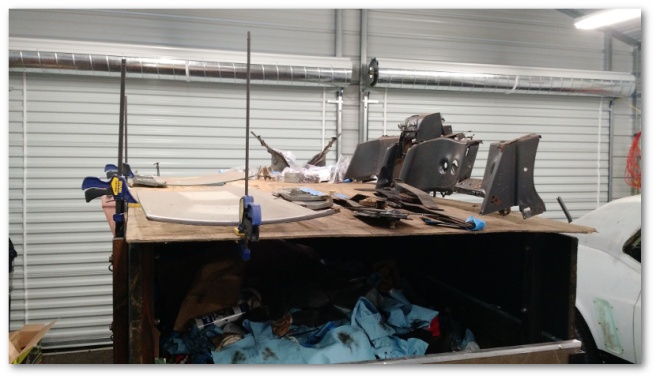
While the shelving and glass were actually well secured, it still gave me the flying willies walking past a shelf on wheels on an almost daily basis. As soon as the paint-shelf contents were safely stashed in the car, the glass shelf contents were re-located with a sigh of “whew, it didn’t break” relief:

glass on more secure shelf

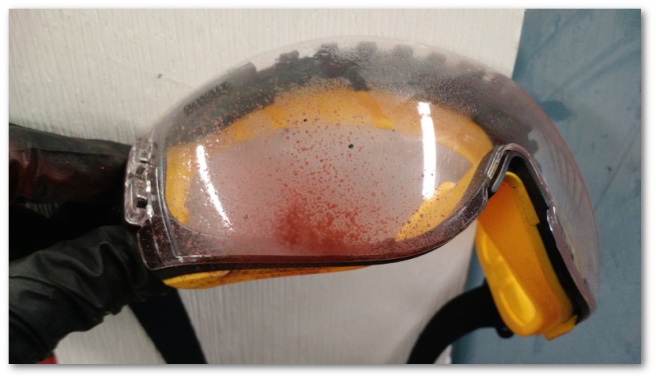
Since the Mustang is going to be gone for up to six months, I also decided to drain the gas tank. This didn’t go as well as it should have. The gas tank I purchased and installed last fall has a drain plug, but I’m wondering now if it was designed for show only. It would not come off. At one point, I got one of my socket wrenches so stuck on the plug that I had to use a compression puller to get it off. I decided another approach was in order.

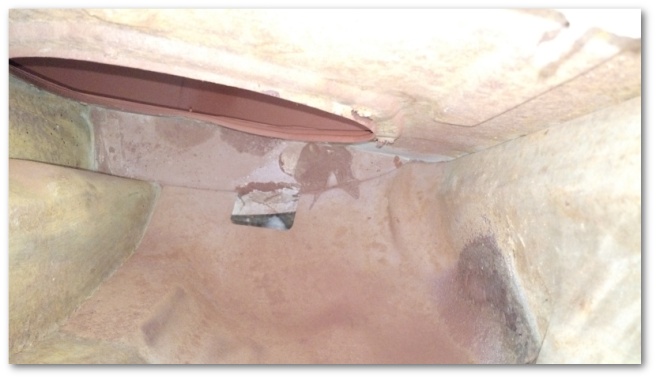
I went down to the auto parts store to ask them if they had a gas siphoning system. Much to my surprise, they didn’t. However, the guy behind the counter used to work at an auto-body shop and told me about a trick he used to use all the time to siphon gas without having to suck the air out using your mouth.

What you do is insert a length of tubing into the gas tank and then cover the tubing with a cloth. You then slide an air gun attached to an air compressor through the cloth like this:

compressed air siphoning

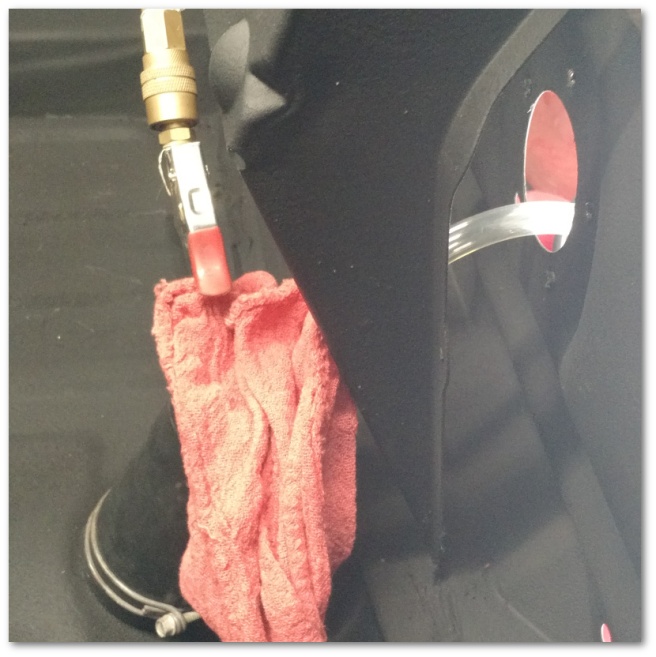
Once you press the trigger on the air gun, pressurized air is forced into the tank. This forces the gas up through the tubing – starting the siphoning process.

The trick worked really well. I was able to get maybe three quarters of the gas out of the tank before my compressor didn’t have enough capacity to start the siphon. Three quarters is enough that even if the gas in there isn’t in great shape around Christmas, I can mix it with good gas and end up with something that’ll be fine.

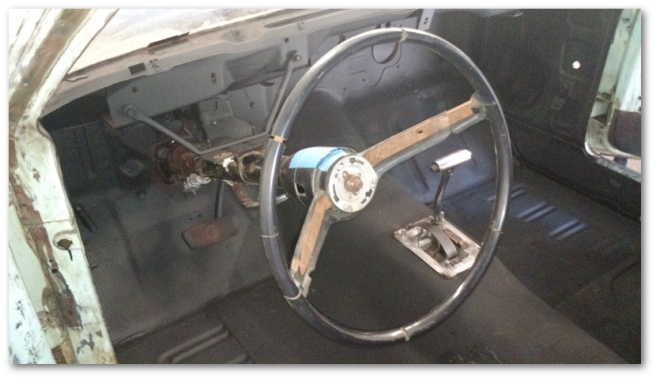
While the Mustang is gone, I’ll have a few things to keep me busy. I have a lower dash to restore and repaint. I also have some window glass to re-glue to their brackets. I also have a heater core to rebuild and some seats to reupholster.

I should be able to keep myself busy.


Maybe Going Bigger…

Well, the visit with the body shop folks didn’t quite go as planned. I was pretty much ready to send the Mustang away to be painted, but alas she remains at home for the time being.

Getting ready for what I thought would be a trip to the body shop, I’d touched up the dome light fixture that needed a little love and painted the interior of the fixture white:

dome light fixture needing touchup

dome light fixture after touchup

I’d installed the screws for the sun visors, dome light, coat hooks and headliner trim:

screws for sun visor in place

The reason I put all of those screws in was to make it easier to find the screw holes once the headliner is put on. Once the headliner is in, I can feel for the already-installed screws and easily make the necessary cuts in the liner to allow the screws to pass through.

I also installed the steering wheel so the car could be pushed around the paint shop if necessary:

steering wheel installed after interior paint

I was ready and excited for the visit the body shop folks were going to give my shop to talk about what I wanted done.

So, what went wrong?

Perfection…

This is the second body shop that has told me “well, we need to protect our reputation. The paint has to be perfect in case someone asks you who did your job.”

I get that. I really do. But this guy was taking it to the point of considering not even taking the job unless the entire car was acid dipped to remove all the rust.  While acid dipping might be a great idea for a car being restored to show-car status, I’m not building a show car.

The dipping alone would cost almost two thousand dollars and involve getting the Mustang to a city 150 miles away. It would also involve taking absolutely everything off the body of the car. The engine, transmission, suspension, brakes (shudder) – even the VIN tag would all have to all come off. All the work I did to the trunk and the floor pans would be for naught as well. And even though that last concern represents an almost perfect example of the sunk cost fallacy, it would still emotionally sting quite a bit to see that work “wasted.”

To say I’m not enthusiastic about the idea of acid dipping would be a severe understatement.

That’s not to say the guy’s concerns about rust are unfounded. He hasn’t been working on this car for a year and a half and only knows what he saw in a 15 minute walk-around. I can understand why what he saw could give him pause:

The doors have small pockets of rust-through.

rust in drivers door skin

I was planning on fixing these by simply replacing the door skin. The body shop guy was also concerned about whether or not the new door skins would fit the door frame well enough without having to fight them for a long time.

In addition to the door rust, the inside of the deck lid has surface rust:

rust inside deck lid

The body shop guy was also concerned that there may be hidden rust behind the rear window. I’ve seen no evidence at all of rust in this area. In fact, the seal around the window is broken in a couple of places and I can see un-rusted metal through it. However, without taking the window out to see the whole picture it’s hard to say for sure what the condition really is under the glass.

lower rear window molding on

Lastly, a concern we both share are the rust spots on the roof:

rust on roof

The roof rust is just on the surface (not shown in that picture is a grinding patch to make sure) but it has pitted the metal slightly. I’m concerned about it, but not concerned-concerned if that makes any sense.

I know there’s little to no rust anywhere else. The quarter panels are fine. The under-body is fine. The cowl is fine. However, the body shop guy doesn’t know this and if I were in his shoes I probably wouldn’t believe me either if I was that concerned about my reputation in the show car painting industry.

The body shop guy didn’t say “no” but rather said he’d think about it and maybe come back to me with some ideas.

One idea that I had this weekend was to propose the following:

  • Get a glass guy out to take both windows off to see what exactly is underneath
  • Ditch the doors completely and buy two new door shells made by Dynacorn
  • Acid dip the deck lid. I should be able to do this locally at any radiator repair shop for a heck of a lot less than two grand

Even with the astronomical cost of the new doors and the probably-not-cheap cost of acid dipping the deck lid the price of the work above wouldn’t even come close to what it would cost to acid dip the entire car. And, assuming we don’t find any rust behind the rear window, we’d be left with the roof rust as the the only area of rust concern left.

That rust is readily accessible to address with its own acid bath or media blasting. I hit the worst of it this weekend with a sander and I know it doesn’t go all the way through. While not “easy” to fix, it’s also not hidden so you’ll know when you’ve got it all.

I don’t know if those actions would make the body shop guy feel any better, but I plan to go down there on Monday to at least present them as an option for going forward.

The other idea that I’m entertaining is going even bigger than I went last week. Remember this?

As I thought more about this though, I was reminded about one of the reasons I’m doing this project in the first place – to learn how to do new things. Since I wasn’t going to learn much by paying someone else to do work for me I decided to suck it up and do it myself.

Holy crap, I’m actually considering doing the painting and the body work on the Mustang myself.

Yes, I’ve mentioned before that I detest paint and paint prep. In large part, I stand by that statement. However, the following facts are compelling me to seriously consider this idea:

  • It’s so far been nearly impossible to find places that will paint these old cars. I’ve been flatly told by two body shops that they wouldn’t even consider doing it and two others will only do “show car” paint jobs with the associated price tags. I don’t plan on this being my last restoration project. If I can’t do this myself, what happens next time I have to get a car I have no plans to take to car shows painted?
  • One of the reasons I’ve never really liked painting is that I’ve never invested in the proper tools. The one exception to that was one time when I painted the interior of my house. In that case, I bought a nice airless paint sprayer. The job went well and while I didn’t really enjoy it, the job didn’t get anywhere close to “detest” levels.

    I checked, and it’s not possible to use an airless paint sprayer on cars if you want a good finish. That would mean I’d have to get new tools. In this case I would invest the money I would have spent paying someone to paint my car into buying the proper tools and equipment to do the job.

  • Did someone say new tools?! At the bare minimum, I’d have to get a real air compressor, a sand blaster, a die grinder, a new variable speed angle grinder, sanding tools, body repair tools (including hammers and a stud welder for pulling dents) and a paint gun. I’m sure there’d be more. These are tools I would have forever and be able to use on future projects. Or doing the Mustang over again if I screwed up which I have to admit is a possibility.
  • This is another learning opportunity – and I am here to learn how to do things after all. After a marathon weekend of watching youtube videos on painting cars, I can attest that this learning opportunity is of Holy-What’s-High-Build-Primer Bat-Man proportions. If learning new things is the goal, this’ll do it…

So, that’s where we’re at. The Mustang is still at home and no official decision has been made. Truth be told, my preference is still on having someone paint it for me. However, I cannot deny that there’s a small amount of excited panic about diving in and learning something totally new and outside my comfort zone.

We’ll see what this week brings…


Go Big Or Go Home…


Hallelujah! My two-and-a-half month part of Project Paint is finally in its end-game! The Mustang is very, very close to being ready to send out to the body shop.

I overcame a big fear yesterday and did something myself that I was originally planning on paying someone else to do. It turned out great and I’m fairly proud of myself. But before I get to that, let me share the story of fixing my big foul-up from last week.

I also found out today that in some areas I applied way too much of the sealer causing areas to still not be totally dry two days later.

The sealer never did dry properly – even after waiting two more days. It was clear I would have to do something about it.

But why did I add so much sealer in the first place to these areas? Well, I was trying to compensate for what I consider to be a poor design for the quarter window drain. When Ford designed my Mustang, they made the area under the rear windows very susceptible to rust. Here’s a cross section of what it looks like inside:

quarter window drain area design

It is very easy for the water to pool in the small lip on the left hand side and be unable to drain – causing rust to develop. To work around that, Ford put some form of (I’m guessing) silicone sealer over the lip like this:

quarter window drain area design with sealant

The problem with the old sealant is that over time it had dried and pulled away from the sheet metal – allowing rust to form beneath it:

rust hiding behind quarter window seal

Last week, I tried to create a similar solution using way too much sealer at once. What I ended up with was a ginormous mess that never dried properly. That meant I had to take it out and re-do it. Holy Shop Rags Bat-Man, that was a big messy job. The following shot was taken after I spent about an hour on each side digging into the sealer with my fingers and various tools trying to get it out:

seam sealer goop mostly out of quarter window area

Once the “big stuff” was out, I ended up going and buying some 3M adhesive remover to help get the rest of the goop out. That took another couple of hours each:

seam sealer goop out of quarter window area

Finally, I was able to prime the area and try again. This time, I used much smaller applications of the sealer and let each application dry before I applied another. It still doesn’t look great, but I think it will do the job just fine:

final quarter window seam sealer

And with that, I was finally ready to paint.

As a reminder, this is what the floor pans looked like a couple of months ago:

filthy floor pans

This is what they look like now:

finished painted floor pans

Everything on the interior received at least three coats of the flat black paint, including the ceiling, sail panels and trunk. It looks really nice and I’m happy with how it turned out.

While the paint drying between coats, I decided to “go big or go home” on Project Paint and get my hood ready for paint – but drilling and cutting into it so my hood scoop would fit.

Initially, I had planned on having the body shop do all this for me since I was afraid I’d screw something up and have to either pay to have my screw up fixed or buy a new hood. You may understand my hesitation here when you learn that the cheap version of a new hood at cjponyparts.com is over 300 dollars. Gulp!

As I thought more about this though, I was reminded about one of the reasons I’m doing this project in the first place – to learn how to do new things. Since I wasn’t going to learn much by paying someone else to do work for me I decided to suck it up and do it myself.

I started with buying a pattern off of Ebay for the cuts I would have to make. This pattern fits on your hood and tells you exactly where you have to cut and drill to make an original equipment hood scoop fit:

hood scoop template on hood

The two big holes in the template you see in the image above are areas I needed to cut out in order to be able to fit the turn signal fixtures in the hood scoop through the hood and into the engine bay.

Not taking any chances, I bought the best brand-new drill bit set I could find. Drilling was a three-step process. I started with a small pilot hole to set the center. I followed that up with a larger drill bit to make the hole larger. Lastly, I used one final bit of the size I needed to fit the hood scoop’s fastening studs.

After a couple of hours worth of very very careful work, I was rewarded with this:

first hood scoop fitting - no lights yet

Then it was time for the really scary part – cutting into the hood’s sheet metal to open up space for the scoop’s light fixtures.

I wasn’t originally sure how I was going to do this. I tried at first to use a small hacksaw but that didn’t work very well. I then moved to using a jig saw, but the blade was too long and caught on the frame of the hood under the sheet metal. The throw of my jig saw was large enough that I wasn’t able to shorten the blade enough to avoid the lower frame without also having the blade totally exit the metal it was cutting. This made cutting in a straight line impossible.

Plan C was to use a cut-off wheel on my rotary tool. In the end, this worked well enough for me to successfully cut away both holes. Cutting the corners took forever since cut off wheels can only cut in a straight line. I had to cut what seemed like a billion teeny tiny little straight lines in order to get the curve that I needed. When I was done, I took a file to the edges to clean them up.

In the end though, I have to say it almost looks like I knew what I was doing:

hood scoop holes

Here’s a shot of the fully-equipped hood scoop mounted to the hood after all the work was done:

first hood scoop fitting - with lights

Huzzah!

It turned out that the hardest part of the day wasn’t doing the cutting, it was dealing with the poor quality of the scoop itself.

If you recall, I purchased a fiberglass reproduction hood scoop instead of spending the non-insignificant extra money on a used original Ford part. I’ve also mentioned before that contrary to most of the reproduction parts I’ve purchased, the hood scoop was of disappointing quality. I came away similarly unimpressed yesterday.

To start with, the studs for the fiberglass scoop were close but not exactly where they should have been. A couple were actually at a slight angle instead of pointing straight down. That meant that my template wasn’t as useful as it could have been.

Second of all, the air dam in the scoop was altogether far too tall and prevented the scoop from sitting flush on the hood:

air dam preventing flush fit of hood scoop

Lastly, the inner scoop support was also not contoured to the hood properly. It overlapped the “arrow” in the hood and stuck down too far – again preventing the scoop from sitting flush with the hood:

inner scoop support not allowing flush fit of scoop.jpg

All of these problems were solvable, but for the price I paid for the scoop I would have expected far better. Note to self, if I ever do this again spring for a real hood scoop on Ebay.

So what’s left? Not much…

  • There’s a couple of touch up spots on the interior that need to be taken care of
  • The trunk needs to have the rest of its old weather stripping removed
  • The trunk also needs to be treated with some of the Eastwood Internal Frame Coating (which is on order)
  • The fender skirts next to the engine should be painted
  • I’m thinking of installing the roof sound deadener (not sure yet if I’m going to though)
  • I need to do a double check that I have everything ready to take to the body shop

I should be able to get all of this finished by next weekend and be ready to deliver the Mustang to the body shop in a little over a week…

Sealed Up And Ready For Top Coat…

I have a confession to make. I am truly and honestly sick of screwing around with the floor pans. I detest paint and paint prep at this scale and am very ready for this part of the project to be done with.

That being said, this part of the Mustang’s restoration is thankfully coming to a close.

At the end of last week, I had the first coat of primer on the floor pans:

first coat of primer on back floor pan

The first order of business this week was to go to the store and buy more primer. I always underestimate how much I’m going to need. However, once I had replenished my stock the remaining coats of primer only took a couple of days:

primed floor pans

With the floor pans finally primed, I turned my attention to the last of the rust problem areas of the Mustang – the cowl.

The cowl is the part of the car right in front of the windshield. Here’s a quick video tour of what a cowl looks like and why it’s susceptible to rust:

My Mustang was really lucky. It had all the detritus that traps water and creates prime conditions for rust…

filthy cowl

…but being a California car it hadn’t seen enough water to really do a lot of damage. There was a small amount of surface rust, but that was about it.

Since I want to give my Mustang every advantage to avoid rust in the future, I needed to find a way to take care of the surface rust and then protect the metal to avoid future rust.

However, the cowl area isn’t the easiest place to get to.

There’s not a lot of access under the cowl roof:

difficult to paint cowl

And virtually no access at all to the nooks and crannies inside the side of the cowl:

inner cowl

Making manners worst, the majority of the surface rust was on the side of the cowl. The following picture was taken through the hole in the upper middle of the image above:

unpainted inner cowl

What you see there is the hole for the fresh air vent. The scale is a little misleading in that it looks like there might be room to get a paint can in there and do some work. Trust me when I say “nope, not gunna happen”.

So, what do to? How do you paint and prevent rust under and inside the cowl of an old Mustang?

You buy special paint with an applicator specifically designed to take care of rust in hard to reach places:

eastwood internal frame coating

Eastwood’s internal frame coating paint isn’t exactly designed for cowls, but the flexible tube applicator that sprays the rust-preventing coating over a large 180 degree area works great for the purpose.

Basically, all I had to do was insert the tube deep into the areas I couldn’t get to and start spraying. The nozzle at the end of the tube diffuses the paint over a large area and does a shockingly good job of covering areas there was no hope of me reaching with an ordinary spray can.

With very little effort, the inner cowl areas of the Mustang are now well protected against rust going forward:

painted inner cowel

The cowl floor is similarly protected:

difficult to paint cowl painted

I also coated the Mustang’s frame rails which have no access whatsoever to their internals with the coating. I’m very happy with how it turned out.

I also wanted to coat the inside of the seat pan as well. The seat pans sit on top of the floor pans and provide the foundation for the seat rails. The only access to paint under the seat pans are through the bolt holes – making this a prime opportunity to use the internal frame coating.

Naturally, I ran out before I could get them painted.

I was faced with a choice of either doing nothing and risking rust, buying more (and waiting a week for it to show up) or hacking something up and using primer instead.

Yeah, that wasn’t much of a choice:

using hacked primer spraying system

The hack was pretty simple:

  1. Pry the applicator tube off the special nozzle it came with from Eastwood
  2. Drill into the primer nozzle to expose a hole large enough to insert the applicator
  3. Paint!

With this set up, I was able to get at the internals of the seat pans with the primer giving me warm fuzzy feeling that even that part of the Mustang is protected from rust. The hack worked great!

Until it didn’t:

thank you safety glasses

The applicator hose decided to spectacularly remove itself from the hacked up nozzle and explode primer everywhere. Thankfully, I was smart and had my safety gear on. Thank you safety glasses. You are the best ten dollars I’ve ever spent.

Naturally, I re-attached the applicator hose and finished the job later.

Last on the list of things to do before the top coat of paint went on was the application of new seam sealer. I decided this time to try a type that could be brushed on:

eastwood brushable seam sealer

I was hoping it would be easier to apply than the type I had to apply with the caulk gun last time. In many ways it was easier, but the cost of easy is apparently mess. I went through countless sets of latex gloves putting this stuff on. It’s gooey and sticky and just all around unpleasant to apply. I also found out today that in some areas I applied way too much of the sealer causing areas to still not be totally dry two days later.

Nevertheless, behold floor pans (in most places) ready for top coat paint:

floor pans seam sealed

This week’s plan is to turn that brownish red floor back to a flat black and be DONE with painting the interior.


Primed For Progress…

As I’ve mentioned before, it’s maddeningly  difficult to construct a compelling narrative for a blog post involving cleaning, painting and priming. Since there’s not much to talk about, I’m going to pretty much let pictures speak for me this week.

While the floor pan rust encapsulator was brushed on, the primer and paint is going to be sprayed. That meant I needed to tape up the front and rear windshield to prevent a bunch of over spray that I would only have to remove later.

I then continued where I left off from last week using the Eastwood Rust Encapsulator paint on the floor pans. I ended up putting two coats on and was really happy with the results:

rust encapsulated rear floor pans

rust encapsulated front floor pans

With the rust encapsulator put down and dried, it was time to break out the spray can primer in preparation for painting. First on the agenda was the roof and the sail panel.

Starting with this:

sail panel before priming

I sprayed my way to this:

sail panel after priming

I then turned my attention to the floor pans and got a first coat of primer on before I ran out of time for the day:

first coat of primer on back floor pan

I’m really happy with how this is turning out. This week I plan to apply a second coat of primer and to get started on replacing the seam sealer. I’m also going to work on priming   the cowl and the bottom of the seat pan. Time permitting, I’ll also work on the cowl and the bottom of the seat pan.