
It’s been a couple of very dirty weeks working on the Mustang’s floor pans. As a reminder, I started with the floor pans looking like this:

To clean everything up, I used my Ryobi cordless angle grinder for most of the work. It worked OK, but I was clearly asking it to do more than what it was designed for. I have four of Ryobi’s 4 amp-hour batteries and I could only work for about three hours before all the batteries were dead and I had to stop.
The reason why I decided to get so dirty and spend so much time on the floor pans is that there was enough rust there that I was concerned it would eat through the pans eventually. To remove the rust, I used a wire wheel brush attachment on the angle grinder and ground most of it away. In doing so, some of the seam sealer that protects the interior of the car from water coming in through the floor pans was also removed. This meant (just like the trunk) that all the seam sealer had to come off in order to lay back down something that would be functional.
I am delighted to say that after hours and hour and hours and battery after battery after battery, the primary grinding and cleaning of the floor pans is complete:

The roof, which was once this:

Is now this:

And my face shield, which was once this:

Is now this:

Along the way, I had a number of eerily familiar when is good enough, good enough conversations with myself. I decided that good enough this time meant slightly more than it did when I was working on the trunk.
I’m actually quite happy with that decision, even though it took a lot more time.
For example, while doing another cleaning pass today I discovered that the interior of the Mustang’s quarter window area was sealed at the factory with what looked to be some white silicone sealant. This sealant had actually pulled away from the quarter panel sheet metal exposing a gap that could easily trap water and cause rust:

Sure enough, when I pulled the sealant out, there was rust hiding behind it:
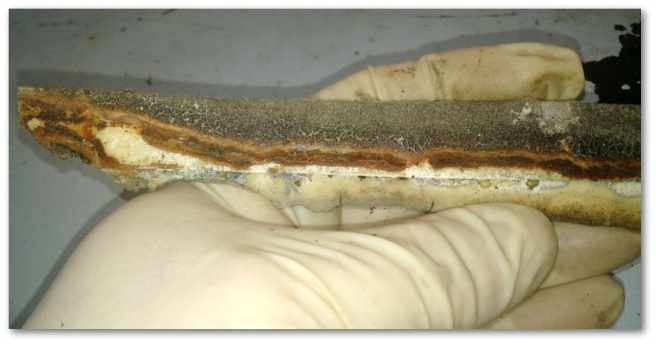
It wasn’t a lot, but rust that isn’t taken care of will eventually spread and eat away at my car – something I’d very much like to avoid. With a little more wire wheel work, the quarter window area is much cleaner and ready for some new and more effective sealant:

I also decided that I’d had enough of fighting the wiring harness inside the car. I had covered the wires to avoid clipping or covering them in goo but the whole assembly was just in my way:
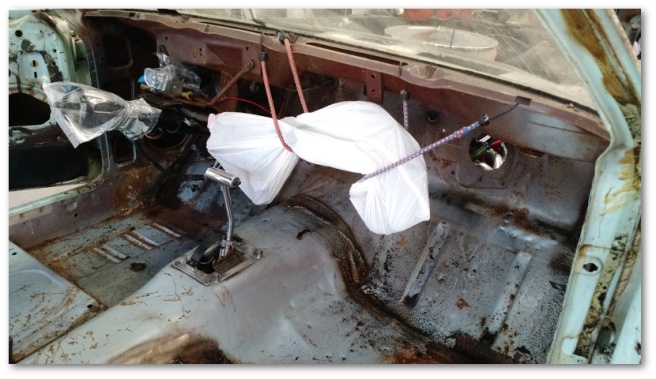
I started to spend some time trying to better move the assembly out of the way when it dawned on me that it would simply be easier and take less time to remove the whole thing.
So out it came:

…leaving me lots of room up front to work on the kick panels and front floor pans:

One additional side benefit of removing the harness is that I now have easy access to the fuse box to clean the terminals. That’s the one remaining part of Project Electrical that I still haven’t got to. Now, instead of turning myself into a pretzel to get at the box the cleaning will be easy:

Even with all this, I’m still not quite at the good enough state yet. There’s still rust hiding in some pits in a number of areas in the floor pans:

This is rust that no grinder will be able to get without either grinding the metal too thin or (worse yet) grinding all the way through the metal. With neither of those options being desirable, I’m going to do something that I probably should also have done on the trunk.
I’m going to use acid to kill the rust. Specifically, phosphoric acid.
My plan is to use two products that are designed to work with a rust preventer called POR-15. POR-15, according to its manufacturer is
a rust-preventive paint designed for application directly on rusted or seasoned metal surfaces. It dries to a rock-hard, non-porous finish that won’t chip, crack, or peel, and it prevents rust from re-occurring by protecting metal from further exposure to moisture.
In order to work properly, POR-15 must have the metal prepped a very specific way. First, a very strong detergent is applied and kept on the metal for 20-30 minutes. This detergent breaks up and removes any and all grease on the surface of the metal. After sitting on the metal for half an hour or so, the detergent is washed off and the second step can begin.
The second step is the application of a metal prep containing phosphoric acid. This metal prop is applied and kept on the metal for another 20-30 minutes before getting rinsed off. This acid gets into the pits where the last of the rust is hiding and kills it dead-dead.
I’m going to follow the two steps above, but I’m not actually going to use the POR-15 paint on my floor pans. I’m concerned that due to the type of surface POR-15 dries to (described in many places as “glass like”) the seam sealer I have to install wouldn’t adhere. Instead, I’m going to use a rust encapsulator from Eastwood in conjunction with their brush-on seam sealer. I’ll top that off with some rattle-can black paint to finally finish the job.
To get ready to apply the detergent, I rolled the Mustang out of the shop today to give its interior a bath with the hopes of getting any remaining big pieces of dirt, dust and grime out of the detergent’s way.

No, the irony of getting the interior of my car wet as part of preventing rust was not lost on me…

2 thoughts on “Bath Time…”