
As a gear-head, I spend a disproportionate amount of time on youtube watching videos on all things car related. Most of these videos fall into one of three categories:
- Researching something I need to learn about in order to restore the Mustang (what to do about my seat belts for example)
- “Feel Good” videos that inspire me to keep going (Pete’s Garage 1969 Mustang restoration and “First start in XXXX years” types of things)
- General auto-repair types of videos just to broaden my horizon of knowledge (I really enjoy Eric the Car Guy’s youtube channel)
Every once in a while though, I stumble upon a video that just makes me laugh.
Sometimes I wish I could take apart and put back together my Mustang as rapidly as these guys do their Jeep:
Now granted, these guys cheated just a bit (first clue: radiator comes off without any water dripping from it) but it’s still a fun video to watch and enjoy – and dream about it actually being this easy…
I can’t really complain though as last week was a fairly productive one with a ton of parts getting removed from the car.
With the lower dash out of the way, the week started with the removal of the heater core and heater core box. The heater core is directly connected to the engine’s cooling system and is essentially a mini radiator that heats the incoming on those cold mornings and warming up the car’s cabin.
Since the heater core is directly connected to the cooling system, it’s full of radiator fluid that I didn’t really want spilled all over my floor. My solution was to cut the heater hose lines near the firewall and plug them using ordinary rubber plugs I purchased at the hardware store:

With the lines plugged, I moved inside and removed the defroster attachment from the heater box. This attachment simply fits inside the box and is attached to the dash frame using a few fasteners:

I was then left with a box with only a single visible fastener on the inside:

Removing the fastener didn’t loosen the heater box in the slightest so my next step was to look in the engine bay for anything else that might be holding it on.
It turns out there are five studs from the heater box that protrude into the engine bay. Four of them are easy to see as they’re right next to the blower motor. The fifth stud (the one on the far right of the picture below) took a while to find since it didn’t look like it would be part of the heater box.

Once those five studs were removed though, the box came right out:

Mr. Previous Owner claimed when I bought the car that he had replaced the heater core. With all due respect, I just … can’t… believe that’s true considering that the box looks like this on the inside:

I suppose it’s possible that he replaced the heater core and simply …forgot… to remove the pine needles and accumulation of dirt but I’m not taking any chances. A new, high-quality heater core has been ordered and will be installed when I restore the heater box while the Mustang is getting painted.
Next on the list were the Mustang’s cowl vents:

These vents source air from the cowl (the slotted metal behind the hood) and route it into the cabin by way of an opening in the foot well. The vent can be opened and closed – or at least that’s what’s supposed to happen. In my case, the vent flappers were very difficult to operate and I was afraid of breaking them if I moved them.
The vents were installed such that the itty-bitty little screws were inset into the plastic and I couldn’t get a socket onto them at all. In the end, I used some of the tiniest little wrenches you’ll ever see in order to be able to get enough of a grip on the screws to turn them:

The wrench did its job though and with a little effort, the passenger vent came right off:

I was able to lubricate the vent using some oil and silicone spray and get it back to working condition. I’ll work on making it pretty later.
The driver’s cowl vent presented a much tougher challenge. Mounted directly in front of the vent was the parking brake assembly. This assembly was not easy to remove. Taking out the three bolts holding it to the foot well was simple enough, but then I needed to figure out how to remove the cable from its bracket:

This cable runs to the rear brakes and is under tension. Not a lot, mind you but enough that it wouldn’t simple come off by grabbing the end with some pliers and pulling.
My eventual solution was to put the parking brake assembly back on the car and then engaging the brake. With the brake engaged, the bracket you see above was rotated, pulling the cable further out from its sleeve in the floor. I then attached a pair of vice grips to the extended cable right in front of the cable sleeve and released the brake.
With the vice grips preventing the cable from retracting into the sleeve and the bracket now in its original position, I had enough slack in the cable to grab the end persuade it to come off the bracket:
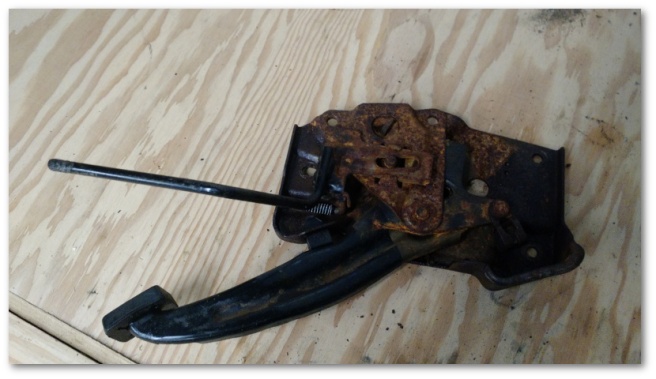
Prior to removal, the parking brake would happily engage, but take considerable effort to disengage. A dose of oil in the moving parts fixed that right up. I still need to sand blast and paint the assembly but it’s good to know when I do I’ll work good as new.
 Next on the list was a quick removal of the interior A-pillar panels that connect the upper dash to the headliner:
And finally, I got to the main event of the week – removing the door glass. I’d been fairly apprehensive about doing this job since screwing up here means a very expensive replacement part.
I’m delighted to report the glass removal went pretty well. Each window is glued (yes, glued) to two brackets inside the door that move on vertical sliders. Removing the glass is actually as simple as unbolting the brackets from their sliders and the window regulator.
And then doing a few hours worth of research on how to get the &*(^&*% glass/bracket combo out of the door.
The problem is that the brackets aren’t just flat plate metal. Each one has a perpendicular piece of metal sticking out that hits the window stop when the window is rolled all the way up:

These little pieces of perpendicular metal make the bracket too big to fit through the space at the top of the door. One technique I’ve seen over and over again on the Internet is to pull the window out as far as you can and then attempt to rotate the window and the frames out of the door. As you can see in the video below where this technique was used to install the glass, the method has a few…shortcomings…
I finally stumbled upon what I think is the “real” way to get the window and brackets into and out of the door. Each door has a little “lip” at the top of the door frame near the front of the door. This lip is juuuuust big enough to fit the bracket with its window stop through without having to rotate it.

The trick is that you can use this lip to remove the brackets one at a time instead of trying to remove both at once. To remove the window, line the front window bracket’s window stop up with the lip and remove the bracket while leaving the back bracket still in the door. Once the front bracket is out, the glass can then be moved forward until the back bracket’s window stop lines up with the lip and can also be removed.
Easy enough, once you know the magic technique:

Also note: it’s even easier when the glue on the obviously-previously-repaired driver’s-side door glass fails and the brackets simply fall off inside the door:

With the glass from both doors removed, I took a deep breath and started to remove the broken quarter window trim on the passenger window. At first, I was really nervous that I was going to have to force the trim off using heat and or sheer will of my stubborn personality. That concern left me about 30 seconds after I started the removal when the trim piece simply pried right off – just like the guy from Craigslist said it would.
Nice!

All in all, it was a nice productive week. The only real downside is that I’m now back to having zero storage space. I’m currently storing the window glass on my primary workbench…

…while I clear some space in my office to store them.
It’s a good thing I’m almost done taking parts off.

3 thoughts on “Parts Removal One By One Hurrah Hurrah….”